How to clean your turntable's stylus
Vinyl may be known for pops and hisses, but it doesn’t have to be that way. Surface noise is almost always preventable. First, make sure your records are clean before playing. We strongly recommend cleaning your records with a record brush every few plays.
But even when playing clean records, surface noise can be caused by dust or debris on the stylus. The diamond stylus tip is the only part of the cartridge that actually touches the record - so dust on the stylus can have an enormous impact on sound quality.
Why should I clean my stylus?
Cleaning your stylus on a regular basis not only ensures a better listening experience for you, but also ensures a longer life for your records. By practicing good stylus hygiene, you can avoid:
- Playback issues: No cartridge will sound good once it has accumulated layers of dust. Accurate sound reproduction requires close contact between the stylus and record grooves. Dust interferes with this contact, causing muffled or scratchy sound that lacks detail. A dirty stylus is also more likely to jump out of the groove. In fact, stylus debris is one of the most common causes of mistracking.
- Damage to records: Dust, dirt, and other debris act as abrasives when caught between the stylus and the record groove. Every time you play a record, you wear it down a little - a dirty stylus can accelerate this process and lead to a loss of clarity.
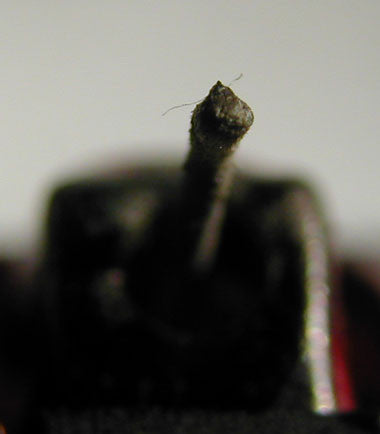
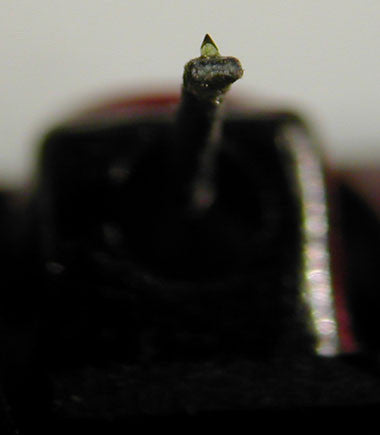
Here's what a stylus can look like before (left) and after (right) being cleaned. Can you spot the difference?
Stylus cleaning methods
We’ve chosen three methods that are simple, fast, and cost-effective. When using any of these techniques, keep in mind that the stylus is incredibly fragile and must be treated with care at all times.
Stylus Brush (available from U-Turn Audio)
This is the simplest and most reliable method, and it's the method recommended by cartridge manufacturer Ortofon. To use your stylus brush, simply move it across the stylus from back to front (the same direction a record spins). A few light passes before each play is enough to clear away the dust that builds up during normal use. Some brushes come with cleaning fluid, but we don't recommend using liquid products on your stylus. As Ortofon warns, liquid cleaners can dissolve the glue bonding the stylus to the cantilever, and solvents can seriously damage the cartridge's internal parts.

Gel-Based Stylus Cleaners
Gel-based cleaners use a soft, tacky pad to lift dust off your stylus. The Onzow Zerodust is probably the best-known example, but several brands make similar products. They're effective and easy to use. Simply lower your stylus onto the gel pad, then lift and repeat until the tip is free of dust and debris. Most pads can be cleaned with a little warm water. Just be sure to lower and lift the stylus straight down and up rather than dragging it sideways, which can stress the cantilever. Some users like to follow up with a stylus brush to clear any residue left behind.
Mr. Clean Magic Eraser
This is an inexpensive DIY method that has become popular on various audio forums. All you need is a Mr. Clean Magic Eraser, which can be found at just about any hardware store. Start by cutting off a 2” square. Next, place that square on either the plinth or the platter – anywhere that the tonearm can easily reach. Then gently lower the stylus onto the eraser and repeat until the stylus stops leaving residue behind.
CAUTION: Some versions of the Magic Eraser have a blue side which is treated with cleaning agents. Make sure you only use the white, untreated side. Do not wet the eraser beforehand.
How often should I clean my stylus?
If you're a regular listener, we suggest cleaning your stylus about once a week. Opinions vary about cleaning frequency – ultimately, the rate of stylus dust accumulation depends on how often you play records and how clean those records are. Regularly cleaning your records before each play is your first line of defense against a dusty stylus. If you have older records with layers of dust in the grooves, it might be time to invest in an ultrasonic record cleaner or a record washer like the Spin-Clean.
Keep a close eye on your stylus during your next few listening sessions to get a better sense how quickly dust builds up and where it accumulates. Beware of subtle accumulation right behind the stylus tip. This can be easy to miss, but will cause distortion.